

If you are here, you have finally realized how important it is to have your own dog breeder website. Your question is… How to quickly create a clean and professional-looking dog breeder website if you have never touched a website in your life? Well, we explain it to you here using three simple steps.
- Get Your Domain & Hosting – your .com and host
- Set up WordPress – quick and intuitive one-click setup
- Install Breedr for WordPress – breeders’ must-have WP plugin
- Customize Your Website – add free themes and plugins
If people keep saying that you should start your own blog or website, do not wait any longer and write the date down: Today is the day you started your breeding website! Pause your day for 15 minutes and just follow the steps below. You’ll have your first visitors before you know it.

1) Get a Domain Name & Website Hosting Service
This is the easiest and most exciting part. Start brainstorming and select your favorite domain names for your dog breeder website, for example here the domain name is breedingbusiness.com. It is an important choice because it will follow you and stick to you for years and represents you, your dogs and your business. Write many down because a lot of domain names are already in use.
Once you have your list ready, head to Bluehost.com to check if your domain name is available. You may be asked to pick a plan before checking the domain name’s availability, I suggest you select Starter as it will be enough for your use and even for more if you grow in the future.

For example, I tried with breedingbusiness.com and it obviously got declined as the domain name is already registered.

I then tried my second choice, demokennelname.com, and it is available for me to purchase. To make your dog breeder website’s domain name memorable, avoid using .net, .org. co.uk, .biz, etc. Stick with the .com, even if it means adding an extra word to find an available one!

Now the domain name is found, you will need to select the hosting package you want. A hosting service is required to set up your domain name and to host your website and make it available to the world. So here, Bluehost asks you to pick your hosting package.
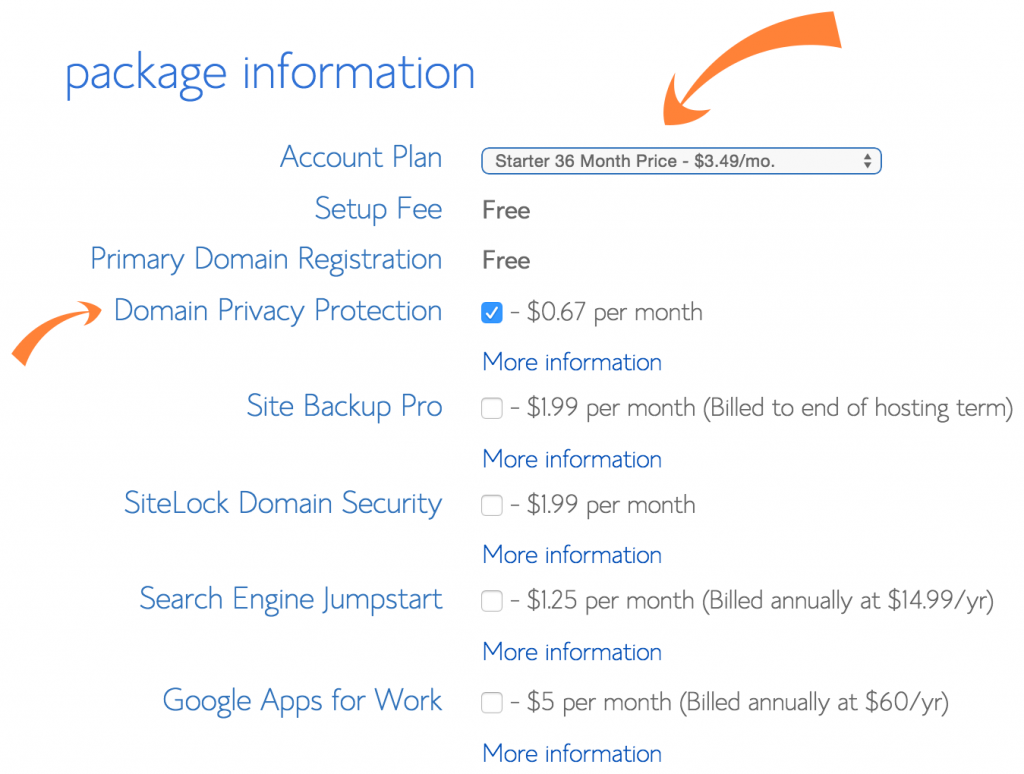
The Starter 36 Month Package is the best deal and it is super cheap considering Bluehost’s hosting and customer service quality. I always recommend the Domain Privacy Protection to avoid having your personal details available for whoever checks your domain name registration details (called a whois lookup.)
Uncheck everything else although, I personally use Google Apps for Work to get my email, cloud storage, collaboration tools, and other business apps. If you change your mind, you can set it up anytime.
2) Set up WordPress (Content Management System)
Once you complete your registration with Bluehost, your domain name and hosting are both ready to be used. You now need to go through the process of installing WordPress. What’s WordPress, I hear your ask… It is the most powerful blogging software, and it is what runs millions of websites worldwide — including Breeding Business! It is completely FREE to set up, easy and extremely intuitive. You do not need to type a single line of code and it takes only a few minutes to set it up! It will run your breeding website in no time!
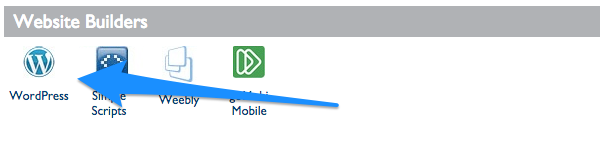
Log yourself in Bluehost panel and get to the Website Builders section, then click the WordPress icon.
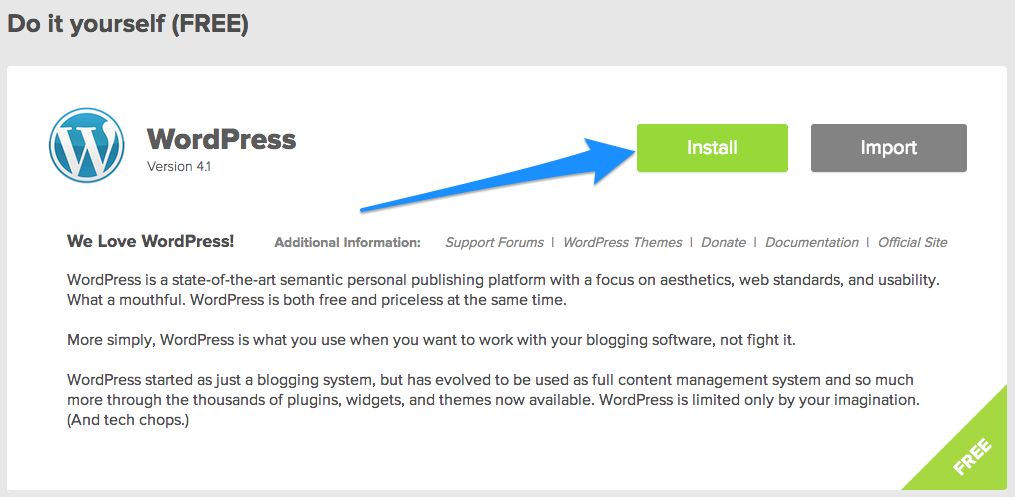
On the next page, you will find a description of what WordPress is (you should know now, right?) — click the Install button under the Do it yourself section, it is obviously free.
 Start the Install process
 Start the Install process
Select the domain name you have just purchased. This is where WordPress will be set up on. Click the Check Domain button.

Tick the terms and conditions box. Do not go through the advanced options yet and finally click Install Now.

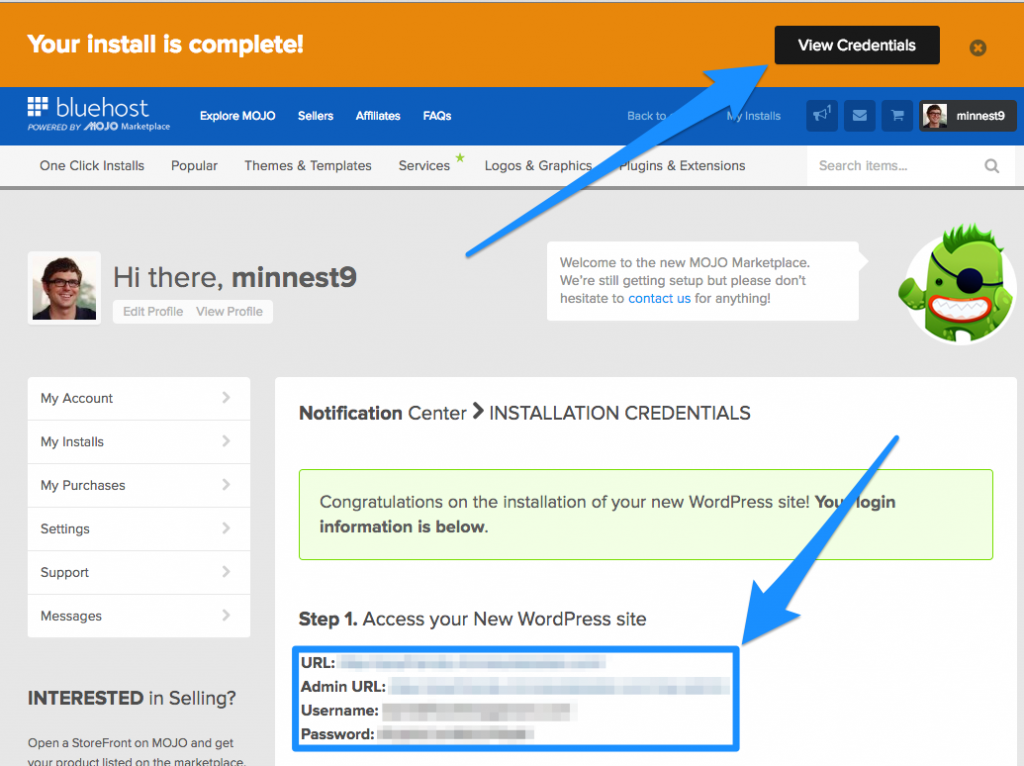
Almost done! A message saying “Your install is complete!” should appear, click the View Credentials button next to it. Take a piece of paper and write the given pieces of information down:
- the admin URL,
- your Username, and
- your Password.
You need these credentials to login for the first time, you can then easily change them to something more personalized if you prefer.
Open a new tab or a new window on your Internet Browser and type the admin URL in the address bar. You should see a screen very similar to the one below. Type the Username and Password here, and log in to your website’s Administration Panel.

Congratulations! You are now on the admin panel’s dashboard with the main menu on the left. This is a part of the website only you have access as the administrator, this is where you can change your website’s name and settings, write and publish new articles and pages, change the look of your website, add plugins, etc.
This is where the power of WordPress is: endless possibilities, for free!
3) Install Breedr for WordPress
Our gem! Loved and used by numerous dog breeders all over the world. Breedr for WordPress is the must-have WordPress plugin for any dog breeder who wants (or has) a website. It simply brings it up to the next level.
As you know, WordPress has numerous free themes to change “the skin” of your website. Breedr is a plugin and enhances “the brain” of your website. And just for your information, Breedr works with all WordPress themes.

We’ve created an installation guide for Breedr but you probably don’t need one as it is so simple to use.
4) Customize Your Dog Breeder Website
Your dog breeder website is now up and running — you can access it using the domain name you chose at the beginning!

Dog WordPress Themes
If you go and check your website out, you will see that it comes with a lovely design already, they are called WordPress Themes. You can keep this basic layout but you can easily change the theme to one more adapted to your activity and industry. Some themes are free but premium WordPress themes, packed with great options, are also available:
- ThemeForest.net — the best source for modern premium WordPress themes
- The Genesis Framework — quickly and easily build incredible websites loved by search engines
- The Thesis Theme — a powerful theme using a system of boxes, skins, and its own tools
- Elegant Themes — over 50+ premium themes for an unbeatable price
Browse The Plugins
If you want to change more than the look of your website, you can use plugins to extend WordPress by adding features. There are thousands of features available to do various things (widgets, social media, social engine optimization, e-commerce, forums, statistics, etc.)
You will usually be fine without any plugin, but we, however, recommend some must-have WordPress plugins that, by experience, will enhance the WordPress experience for you and your visitors. They are all free.
- Jetpack — adds powerful features including site stats and social sharing
- Akismet — eradicate the spam in your post comments
- Contact Form 7 — makes adding contact forms quick and easy
Breedr for WordPress installed just before is a must-have if you want a great dog breeder website. There is no other plugin out there for dog breeders. Breedr IS the reference.
Once your website is up and running, make sure you update it often and avoid these 7 common kennel website mistakes.
3 comments on “Create Your Dog Breeder Website In 3 Steps”
[…] is a free tool, so you should be part of this WordPress world! We wrote a great article “Create Your WordPress Dog Breeder Website In 3 Easy Steps” to guide you, step by step, so do not waste any time and get yourself […]
[…] Your Breeder Website […]
I’d like to see how these websites look when finished.